Using the LakeEffect Research Cloud
Managing your Project with the Cloud Dashboard
Allocations to the LakeEffect Cloud are requested and managed through the ColdFront Resource Allocations Management Tool.
To request an allocation to LakeEffect follow CCR's ColdFront Allocation Requests documentation.
Once approved through ColdFront you will be informed when your cloud access is ready and you will be able to login in to the LakeEffect Web Console
where you can manage your project's cloud resources and view information on your group's usage.
VPN Required
Access to the LakeEffect Dashboard is restricted to UB and Roswell Park networks (either on campus or connected to their VPN services). See CCR's VPN documentation for more information.
From the The LakeEffect Web Console, select CCR OpenID Connect option and authenticate using your CCR account. Leave the domain field blank. Don't have an account? see the Getting access to CCR documentation
![The LakeEffect OpenStack login window with a dropwon with the default [CCR OpenID Connect] option selected for authentication, a text field for "Domain" and a button bottom right: [Sign in]](../../images/cloud/openid.png)
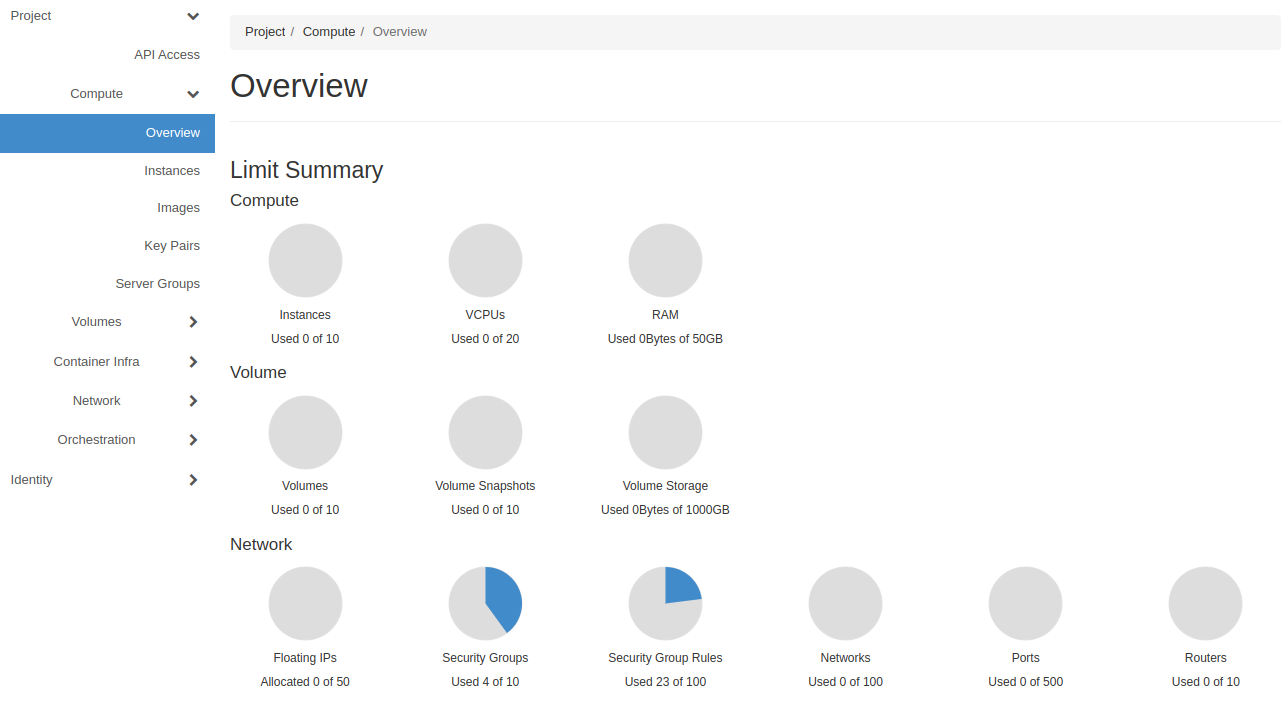
After a successful login, you will be redirected to your project Overview in the LakeEffect Dashboard:
Managing Openstack Credentials
Keypairs
Key pairs are SSH credentials which are injected into images when they are launched. Creating a new key pair in Openstack registers the public key and downloads the private key. In order to connect to any cloud instances you will need to utilize an SSH key pair.
Note
The first time you login to the Openstack Management Console you need to create a key pair so that you'll be able to remotely connect to your instances. This should be the first thing you do.
There are two ways to accomplish this:
- Create the key pair in the Openstack Management Console, or
- Upload an existing SSH public key to Openstack that you've generated on your personal computer
Alert
The Private key of the Keypairs should be stored in a safe place and kept very secure. If these credentials were to be compromised, an attacker would gain full access to your Instances. Do NOT store these credentials on front end machines of the clusters or shared storage (such as home or project directories or global scratch).
Creating a key pair in Openstack
- Click on the Key Pairs menu
- Click on the
+Create Key Pair![The LakeEffect "Create Key Pair" window with a text field for "Key Pair Name" and a pulldown for "Key Type" with [SSH Key] selected. There is a button bottom left: [Cancel] and a button bottom right: [Create Key Pair]](../../images/cloud/keypair-create.png)
- Enter a Key Pair Name
- Select "SSH Key" for Key Type
- Click on the
Create Key Pair
Your keypair will be created and your browser will save the private (pem) file locally. You will use this pem file to ssh into you instances.
Importing existing key pair in Openstack
- Click on the Key Pairs menu
- Click on the
+Import Public Key![The LakeEffect "Import Public Key" window with a text field for "Key Pair Name" and a pulldown for "Key Type" with [SSH Key] selected, a button: [Choose file] and a larger text field for "Public Key". There is a button bottom left: [Cancel] and a button bottom right: [Import Public Key]](../../images/cloud/keypair-import.png)
- Enter a Key Pair Name
- Select "SSH Key" for Key Type
- Choose file location of your public key or paste the public key into the form
- Click
Import Public Key
You can use many different key pairs on your account, if desired. You will be able to choose which pair is used when launching an instance.
Tip
It is recommended that all users in a LakeEffect project have their own keypairs. This is much more secure than one shared keypair for the group and provides more accountability.
Security-Groups
Security groups are an important concept to understand in Openstack. Security groups define a set of IP filter rules that determine how network traffic flows to and from an instance like a firewall. Because the Cloud needs to be flexible, the LakeEffect public IP address space is not protected by the UB firewall; therefore, it's critical that you setup secure access to your instances. Security groups are the primary method from protecting your VMs from Internet Security Threats.
Creating Security Groups
Note
The default rule in LakeEffect only allows outbound (egress) traffic - no inbound (ingress) traffic is permitted. We recommend you create a new security group and leave the default group alone. If you remove the default security group you will need to add these rules to your own security group otherwise you will not be able to connect to your instance.
- Click on the Network -> Security Groups menu
![The LakeEffect Dashboard open to the "Networks" section in the "Security Groups" subsection. There is a single row entry, with the name "default", a long hexadecimal Security Group ID, a Description "Default security group" and a button: [Manage Rules]](../../images/cloud/security-groups.png)
- Click on the
+Create Security Group![The LakeEffect "Create Security Group" window with text fields for "Name" and "Description" and a button bottom right: [Create Security Group]](../../images/cloud/create-sg.png)
- Name the Security Group and give it a description
- Click
Create Security Group
You will now be able to manage the individual rules in the Security group you just created
![The LakeEffect Dashboard open to the "Manage Security Group Rules" window for the newly created security group. There are two rows, both rows start with a "Direction" with the value "Egress", an "Ether type" with the value "IPv4" on the uppper row and "IPv6" on the lower, an "IP Protocol" with the value "Any", a "Port Range" with the value "Any" a "Remote IP Prefix" with an IP address representing "Any", that is "0.0.0.0/0" for IPv4 and "::/0" for IPv6, there are empty "Remote Security Group" and "Description" fields followed by a button: [Delete Rule]](../../images/cloud/manage-sg.png)
Managing Security Group Rules
- Click on the Security group to modify
- Click on the
+Add Rule![The LakeEffect Security group "Add Rule" window with a "Rule" pulldown set to [SSH], a text field for "Description". a "Remote" pulldown with [CIDR] selected and a text field "CIDR" with an example IP address of "128.205.41.12/32". There are two buttons, bottom right: [Cancel] and [Add]](../../images/cloud/add-sg-rule.png)
- Fill in all the fields depending on the rule you want to create and click
Add - Continue to add all the necessary rules to open access to the VM.
Danger
Only open ports for the services you require and only open those ports to the IP addresses that you want to provide access to. It is absolutely crucial that you do NOT open all ports to the world!
Instances
Instances are virtual machines that run inside the cloud, they are the basic units of compute you will use within LakeEffect. An Instance is made up of a Flavor, an Image and it is attached to a Network for it to connect to.
For more information about instances, flavors and images please see the official OpenStack "Launch instances" Documentation
Flavors
Standard
Instance Type vCPU Memory Storage std-compute-1 1 cores 4 GB 20 GB std-compute-2 2 cores 8 GB 40 GB std-compute-4 4 cores 16 GB 80 GB std-compute-8 8 cores 32 GB 160 GB std-compute-10 10 cores 40 GB 200 GB std-compute-16 16 cores 64 GB 320 GB std-compute-32 32 cores 128 GB 640 GB Advanced
Note
Advanced or GPU Subscription required to access GPU or Fast-IO Flavors
GPU
Instance Type GPU vCPU Memory Storage adv-gpu-8 V100-32 8 cores 32 GB 100 GB adv-gpu-16 V100-32 16 cores 64 GB 100 GB FastIO
Note
FastIO/NVME Storage is volatile (instance storage) and will be destroyed when the instance is deleted.
Instance Type vCPU Memory NVME Storage Block Storage adv-nvme-4 4 cores 16 GB 100 GB 80 GB adv-nvme-8 8 cores 32 GB 250 GB 160 GB adv-nvme-16 16 cores 64 GB 500 GB 320 GB
Instance Type vCPU Memory PMEM Storage Block Storage adv-pmem-16 16 cores 64 GB 500 GB 320 GB adv-nvme-32 32 cores 128 GB 1000 GB 640 GB Custom Flavors
If you require a flavor that is not listed, you can contact CCR Help and we can work with you on creating a custom flavor that suits your needs.
Images
An Image is a stock copy of an operating system that you will provision your instance with. CCR provides a current set of the major Linux distributions which are updated perodically. These are all stock images pulled directly from the various vendor repos. Due to license restrictions, CCR does not provide Microsoft Windows images.
Operating System Version Build Date CentOS 8-stream 2024-04-16 CentOS 9-stream 2024-04-16 Debian 12.5 2024-04-15 Fedora 39 2023-11-01 Rocky 8.9 2023-11-19 Rocky 9.3 2023-11-13 Ubuntu 20.04 2024-04-08 Ubuntu 22.04 2024-04-16
Creating an Instance in LakeEffect
Note
Before you can launch and login to instances, you must have setup a key pair as described here
From the LakeEffect Dashboard go to Compute -> Instances
Click on Launch Instance button at the top right corner. This will bring up the instance launcher which will guide you in creating your new instance by selecting your instance source, Flavor, Network, Security groups, and Keypair.
Note
Your project has a quota set for the total number of instances you're permitted to run. The chart on the right shows the current usage. If you've hit your limit, please contact CCR Help for assistance.
Step 1: Details
- Fill out instance name and description
- Availability zone: can be left as default.
- Count: is the number of instances you want to start up.
![The LakeEffect "Launch Instance" window with a read-only text field "Project Name" showing the current project, a text field for "Instance Name", a text field for "Description", an "Availability Zone" pulldown set to [nova] and a "Count" pulldown set to [1]. There are three buttons bottom right: [Back] [Next] [Launch Instance]](../../images/cloud/instance-details.png)
- click
Nextwhen done to go to the Source screen.
Step 2: Source
On the Source tab, there are many things you need to consider when deciding how you want your instance created.
Select boot source: Options are Image, Instance Snapshot, Volume, Volume Snapshot
Create a new volume: Yes/No (default is Yes which is what we recommend)
Volume Size: Choosing an image will auto-populate the size, but you can choose a larger size.
Delete Volume on Instance Delete: Default is No (we recommend selecting Yes unless you want to use this volume attached to other instances)
Note
You should pay attention to volume sizes and orphaned volumes because it all counts against your volume storage quota.
If Boot source is Image, Choose an operating system from the list of images CCR provides.
![The LakeEffect "Launch Instance Source" window has many fields: a "Select Boot Source" pulldown with [image] selected with a "Create New Volume" "Yes/No" selector to the right, a "Volume Size (GB)" numeric field with a "Delete Volume on Instance Delete" "Yes/No" selector to the right, a selected operating system, in this case "Ubuntu 22.04" followed by information on the operating system including size, file format and a "Visibility" field showing "Public", below this there is an "Available" section with a text search field and a list of operating systems below. There are three buttons bottom right (cut off from the image): [Back] [Next] [Launch Instance]](../../images/cloud/instance-source.png)
- click
Nextwhen done to go to the Flavor screen.
Step 3: Flavor
A Flavor defines the compute, memory, and storage capacity of our instance.
- Choose the most appropriate sizing for your use case from a list of pre-selected resources
![The LakeEffect "Launch Instance Flavor" window with a single row with the currently selected instance type showing "Name": "std-compute-1", "VCPUs": "1", "RAM": "4GB", "Total DIsk: "20GB", "Root Disk": "20GB", "Ephemeral Disk": "0GB" and "Public": "Yes". Below this there is an "Available" section with a text search field and a list of instance types below. There are three buttons bottom right (cut off from the image): [Back] [Next] [Launch Instance]](../../images/cloud/instance-flavor.png)
Note
Depending on your usage and quota, not all flavors may be available. This is denoted by the yellow triangles next to the particular resource not available.
- click
Nextwhen done to go to the Networks screen.
Step 4: Networks
The ccr-public is the default Provider Network available to Instances. This network will allocate an IP on the UB public network.
![The LakeEffect "Launch Instance Network" window with is a single row showing the allocated network showing "Network": "ccr-public", "Subnets Associated": "ccr-128.205.11", "Shared": "Yes", "Admin State": "Up", "Status": "Active". Below this there is an "Available" section with a text search field and an empty list of alternate networks. There are three buttons bottom right: [Back] [Next] [Launch Instance]](../../images/cloud/instance-network.png)
LakeEffect users have the ability to create their own Private networks. For more information, see CCR's Advanced Cloud Topics documentation.
- click
Nextwhen done to go to the Network Ports screen.
Step 4: Network Ports
Unless you have created your own Private Network and Ports, there is nothing needed in this section.
![The LakeEffect "Launch Instance Network" window showing no allocated or available private networks. There are three buttons bottom right: [Back] [Next] [Launch Instance]](../../images/cloud/instance-networkports.png)
- click
Nextwhen done to go to the Security Groups screen.
Step 5: Security Groups
Security Groups are an important concept to understand in Openstack. Security groups define a set of IP filter rules that determine how network traffic flows to and from an instance like a firewall. The default rule in LakeEffect only allows outbound traffic - no inbound traffic is permitted.
You will need to assign a security group to the instance that allows access via SSH in order to be able to connect to it. This was explained previously in the Security Groups section.
![The LakeEffect "Launch Instance Security Groups" window. There is an "Allocated" section with two rows, showing security groups: "default" and "My Test Security Group" respecitvely, each has a text description followed by a "Down Arrow" button. Below this section there is an "Available" section with a text search field and an empty list of security groups. There are three buttons bottom right: [Back] [Next] [Launch Instance]](../../images/cloud/instance-security.png)
Tip
Security groups act at the instance level and can be changed after instance creation.
- click
Nextwhen done to go to the Key Pair screen.
Step 6: Key Pair
Key Pair allows you to SSH into your instance. You may select an existing key pair, import a key pair you've already created (see the previous section on Key Pairs ), or generate a new key pair from this tab.
![The LakeEffect "Launch Instance Key Pair" window. At the top there are two buttons, [Create Key Pair] [Import Key Pair], below that there is an "Allocated" section showing one row with the key pair: "Name": "test-keypair", "Type": "ssh" followed by a "Down Arrow" button. Below this there is an "Available" section with a text search field and a list of other key pairs, each with an "Up Arrow" button next to them. Below this there are two text fields to set and confirm the admin password. There are three buttons bottom right: [Back] [Next] [Launch Instance]](../../images/cloud/instance-keypair.png)
- click
Nextwhen done to go to the Configuration screen.
Step 7: Configuration
This tab allows you to script certain configuration details when an instance is launched. Please click the question mark icon on this tab for more details. This is for advanced users only.
![The LakeEffect "Launch Instance Configuration" window. There is a [Choose File] button to load the Customization Script from a file, alternatively there is a text field below to enter the "Customization Script". Below these there is a "Disk Partition" pulldown with "Automatic" with a "Configuration Drive" radio button below. There are three buttons bottom right: [Back] [Next] [Launch Instance]](../../images/cloud/instance-config.png)
Some users may want to partition the root disk of an instance in a specific way. To do this, change the Automatic to Manual under Disk Partition and you will be prompted to setup the partitions when the instance is launched.
Logging in to your Instance
Once your instance has booted up, the only way to connect to them is using SSH with the keypair that you selected when you created the instance. You also need to make sure that you have a security group that allows ssh in from your IP address.
Do not open unecessary ports
You should only open the bare minimum ports and to the smallest range of IP addresses needed. The more ports that are open the more susceptible your instance is to compromise. CCR will shut down insecure instances. If you'd like to make your instance available to all UB networks, contact CCR Help for the list of current UB networks.